Dr. Hemant Sharma
FRCS (England) MRCS (England) DNB
Specialist in Revision Lower Limb ArthroPlasty
Complex Hip, Knee and Sports Injury

An ankle injury can instantly sideline an active individual, but not all sprains are created equal. When evaluating an ankle injury, the clinical diagnosis typically falls into one of two distinct categories: a standard lateral twist or a much more severe syndesmotic injury. Understanding the structural differences of a High Ankle Sprain vs. Normal Sprain is essential for setting realistic recovery expectations and planning an effective rehabilitation timeline.
Many individuals mistakenly assume that any turned ankle will heal within a couple of weeks with basic rest. However, a high-level syndesmotic tear disrupts an entirely different skeletal region than a typical twist. Delving into the structural mechanics of a High Ankle Sprain vs. Normal Sprain reveals why the upper ligamentous structures require extended stabilization time to heal properly.
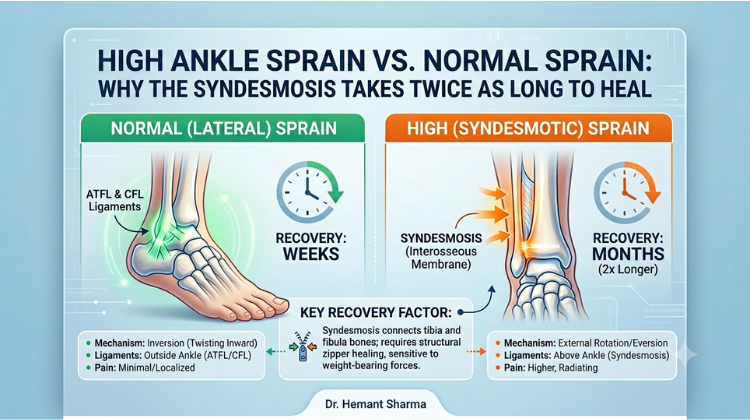
To understand why a high sprain demands a significantly longer recovery window, one must examine the specific tissues damaged in a High Ankle Sprain vs. Normal Sprain. A normal or lateral ankle sprain typically involves an inversion mechanism, where the foot rolls inward. This motion stretches or tears the outer ligaments, primarily the anterior talofibular ligament (ATFL).
Conversely, a high ankle sprain involves an eversion or external rotation mechanism. This force tears the syndesmosis—a thick, fibrous complex that connects the tibia (shin bone) and fibula (outer lower leg bone). The syndesmosis functions essentially like a structural zipper, maintaining joint stability above the ankle socket. When comparing a High Ankle Sprain vs. Normal Sprain, the structural demands placed on the syndesmosis are vastly greater than those on the lateral ligaments, as it must resist the forces that naturally push the lower leg bones apart.
A major reason recovery times differ when analyzing a High Ankle Sprain vs. Normal Sprain is how body weight impacts the injured area. With a traditional lateral sprain, once the initial swelling subsides, straight-line walking is often manageable because the vertical loading axis of the leg bones remains stable.
When a syndesmotic injury occurs, every single step forces the tibia and fibula to separate. This separation prevents the torn ligament fibers from resting closely together to knit back together. Forcing early weight-bearing on a healing syndesmosis continually disrupts the delicate cellular repair process, explaining why a High Ankle Sprain vs. Normal Sprain recovery timeline frequently takes twice as long.
Lateral Sprain Constraints: Minimal structural widening; forces are mostly lateral.
Syndesmotic Sprain Constraints: Extreme rotational widening; axial forces delay healing.
Immobilization Needs: High sprains often require rigid boot casting or non-weight-bearing restrictions to avoid bone separation.
Accurate clinical identification is critical when managing a High Ankle Sprain vs. Normal Sprain. A traditional sprain presents with localized bruising and tenderness below the ankle joint line, around the outer bony prominence.
A high ankle sprain causes pain that radiates up the lower leg, along the anterior shin bone. Sports specialists perform targeted manual examinations, such as the "Squeeze Test," compressing the mid-calf to check if it reproduces pain at the lower syndesmosis. Misdiagnosing a High Ankle Sprain vs. Normal Sprain as a basic twist can lead to premature weight-bearing, severe joint instability, and long-term performance issues.
Neglecting proper care guidelines during a High Ankle Sprain vs. Normal Sprain transition can lead to lasting ankle problems. If a torn lateral ligament heals loosely, it may cause mild ankle giving-way, which can usually be managed with targeted balance exercises.
If a high syndesmotic injury heals with residual separation between the tibia and fibula, it changes how weight transfers across the ankle joint. This structural misalignment can cause early osteoarthritis, persistent pain, and reduced athletic performance. Managing a High Ankle Sprain vs. Normal Sprain carefully ensures the ankle joint width is maintained, protecting the cartilage from long-term wear and tear.
When conservative care pathways fail, surgical interventions differ significantly when choosing between a High Ankle Sprain vs. Normal Sprain. Standard ligament tears rarely require surgery unless severe chronic instability develops down the line.
Severe Grade III high ankle sprains, however, often require dynamic or rigid fixation to hold the shin bones together while the tissue repairs. Modern orthopedic techniques utilize flexible internal fixation systems, like the TightRope system, or structural syndesmotic screws. Understanding the treatment paths for a High Ankle Sprain vs. Normal Sprain helps patients prepare for either progressive physical therapy or targeted surgical stabilization.
Understanding why a high sprain demands an extended recovery period requires a comparison of the distinct ligament systems involved in high ankle sprain vs. normal sprain mechanisms.
+-------------------------------------------------------------------------------------------------------------------+
| LIGAMENT ANATOMY & BIOMECHANICAL MATRIX |
+----------------------------------+---------------------------------------+----------------------------------------+
| Structural Dimension | Low Ankle Sprain (Lateral Complex) | High Ankle Sprain (Syndesmotic Complex)|
+----------------------------------+---------------------------------------+----------------------------------------+
| Primary Ligaments Involved | ATFL (Anterior Talofibular) & | AITFL, PITFL, Transverse Ligament, and |
| | CFL (Calcaneofibular Ligament) | Interosseous Membrane (IOM) |
+----------------------------------+---------------------------------------+----------------------------------------+
| Primary Injury Mechanism | Inversion with plantarflexion | External rotation with eversion and |
| | (rolling foot inward under body) | dorsiflexion (pivoting on planted foot)|
+----------------------------------+---------------------------------------+----------------------------------------+
| Structural Function | Restricts excessive inversion and | Binds tibia and fibula together; |
| | anterior translation of talus | maintains structural ankle mortise |
+----------------------------------+---------------------------------------+----------------------------------------+
| Mechanical Strain During Walking | Low direct axial widening force; | High axial widening force; weight |
| | motion occurs primarily along planes | forces tibia and fibula to separate |
+----------------------------------+---------------------------------------+----------------------------------------+
The standard lateral ankle complex consists of three key ligaments that stabilize the outer ankle joint:
Anterior Talofibular Ligament (ATFL): The weakest component of the lateral complex and the first tissue to tear during a classic inversion injury.
Calcaneofibular Ligament (CFL): Connects the fibula to the calcaneus (heel bone), limiting tilt within the subtalar joint.
Posterior Talofibular Ligament (PTFL): A robust posterior band that resists backward displacement of the talus, rarely tearing in simple twists.
These ligaments lie outside the main weight-bearing column of the leg. As a result, walking exerts minimal direct separation force on repairing lateral fibers once acute inflammation subsides.
[ SYNDESMOTIC "ZIPPER" COMPLEX ]
Tibia (Shinbone) Fibula (Outer Bone)
+------------------+ +--------------------+
| |====================================| |
| | Interosseous Membrane (IOM) | |
| |====================================| |
| | AITFL (Anterior Inferior) | |
| |------------------------------------| |
+------------------+ +--------------------+
\ /
\--- Ankle Mortise Socket (Talus) -/
The syndesmosis acts as a high-tensile fibrous joint connecting the distal tibia and fibula. This complex includes:
Anterior Inferior Tibiofibular Ligament (AITFL): Spans the front of the distal tibiofibular joint.
Posterior Inferior Tibiofibular Ligament (PITFL) & Transverse Ligament: Heavy posterior structures providing deep structural support.
Interosseous Membrane (IOM): A broad sheet of fibrous tissue extending up the lower leg between the tibia and fibula.
Together, these structures create a secure socket—the ankle mortise—that holds the talus in place. When the syndesmosis is torn, the tibia and fibula separate under weight-bearing loads, disturbing normal joint alignment.
The anatomical distinction between a high ankle sprain vs. normal sprain explains why recovery times vary significantly between the two injuries.
[ AXIAL WEIGHT DISTRIBUTION MECHANICS ]
|
+-------------------------------------------+-------------------------------------------+
| |
[ STEPPING ON A LOW SPRAIN ] [ STEPPING ON A HIGH SPRAIN ]
| |
- Load travels axially through ankle joint - Talus acts as a rigid wedge within mortise
- Lateral ligaments stay relatively relaxed - Forces tibia and fibula to spread apart
- Minimally disrupts healing ATFL collagen fibers - Repeatedly stretches torn syndesmotic tissue
|
v
[ IMPLICATION FOR RECOVERY ]
- Low Sprain: Rapid early weight-bearing (2–4 weeks)
- High Sprain: Strict initial immobilization (6–12+ weeks)
The upper surface of the talus bone is wider at the front than at the back. When the foot flexes upward during walking (dorsiflexion), this wider front section moves back into the ankle mortise. If the syndesmotic ligaments are torn, the talus acts as a wedge, forcing the tibia and fibula apart with every step. This separation disrupts healing tissue and delays structural recovery.
Lateral ankle ligaments benefit from a rich surrounding vascular network that promotes localized blood flow, cellular migration, and tissue repair. In contrast, the deep interosseous membrane and syndesmotic ligaments have a sparse blood supply. This limited blood flow slows down collagen synthesis, extending the timeline required for the syndesmosis to regain its structural integrity.
Distinguishing a high ankle sprain from a low ankle sprain requires systematic physical testing and appropriate imaging techniques.
+----------------------------------------------------------------------------------------------------+
| CLINICAL DIAGNOSTIC EVALUATION MATRIX |
+-----------------------+------------------------------------+---------------------------------------+
| Diagnostic Test | Procedure Method | Positive Indicator for High Sprain |
+-----------------------+------------------------------------+---------------------------------------+
| Squeeze Test | Squeezing mid-calf (tibia and | Pain radiating down to the distal |
| | fibula) at mid-leg height | syndesmosis above the ankle joint |
+-----------------------+------------------------------------+---------------------------------------+
| External Rotation | Stabilizing lower leg while | Sharp pain felt above the ankle joint |
| Stress Test | rotating foot outward | as the talus spreads the mortise |
+-----------------------+------------------------------------+---------------------------------------+
| Cotton Test | Translating talus laterally inside | Excessive lateral movement or clunking|
| (Intraoperative) | the ankle mortise | indicating mortise instability |
+-----------------------+------------------------------------+---------------------------------------+
| Weight-Bearing | Bilateral standing anteroposterior | Medial clear space > 4 mm or |
| Radiographs | (AP) and mortise views | tibiofibular clear space > 6 mm |
+-----------------------+------------------------------------+---------------------------------------+
[ CLINICAL ASSESSMENT FOR LOWER LEG PAIN ]
|
+---> Physical Tests: Squeeze Test & External Rotation Stress Test
|
+---> Standing Stress Radiographs (Assess Medial / Tibiofibular Clear Space)
|
+---> High-Resolution Contrast MRI (Evaluate AITFL, PITFL, and IOM Integrity)
The Squeeze Test: Compressing the mid-calf compresses the upper tibia and fibula, causing the lower ends of the bones to bow outward. Pain felt at the distal lower leg during this test indicates syndesmotic damage.
External Rotation Stress Test: With the knee flexed at 90 degrees, the foot is gently rotated outward relative to the leg. Recreating pain in the anterior lower leg indicates a high sprain.
Standard non-weight-bearing X-rays can miss mild-to-moderate syndesmotic injuries. Accurate evaluation requires:
Weight-Bearing Stress Radiographs: Standing X-rays highlight subtle joint widening under load. A tibiofibular clear space greater than 6 mm or a medial clear space greater than 4 mm suggests syndesmotic instability.
Magnetic Resonance Imaging (MRI): The standard imaging method for evaluating soft tissues. High-resolution MRI visualizes torn AITFL, PITFL, and interosseous membrane fibers, helping clinicians grade the injury and plan appropriate treatment.
Treatment choices depend on the structural severity of the ligament tear and the presence of joint instability.
+----------------------------------------------------------------------------------------------------+
| SYNDESMOTIC INJURY GRADING |
+-------------------+------------------------------------+-------------------------------------------+
| Severity Grade | Anatomical & Structural Condition | Recommended Treatment Approach |
+-------------------+------------------------------------+-------------------------------------------+
| Grade I | Microscopic AITFL tearing; no | Rigid cast/boot immobilization for 4 to 6 |
| (Mild) | widening or structural instability | weeks, followed by physical therapy |
+-------------------+------------------------------------+-------------------------------------------+
| Grade II | Partial AITFL & IOM tearing; | Protected weight-bearing or dynamic |
| (Moderate) | latent instability under stress | surgical stabilization if unstable |
+-------------------+------------------------------------+-------------------------------------------+
| Grade III | Complete disruption of AITFL, | Surgical stabilization (TightRope suture |
| (Severe) | PITFL, and IOM; frank dislocation | button or syndesmotic screws) required |
+-------------------+------------------------------------+-------------------------------------------+
[ GRADE I (STABLE) ] ===> Non-Weight-Bearing Immobilization -> Progressive Rehabilitation
[ GRADE II (LATENT) ] ===> Stress Radiograph / Arthroscopy -> Targeted Stabilization
[ GRADE III (UNSTABLE) ] ===> Surgical Reduction & Fixation (Suture-Button or Transfixation Screws)
Stable Grade I syndesmotic injuries require protection from rotational forces. Unlike low ankle sprains—which benefit from early functional movement—a high ankle sprain typically requires an initial period of non-weight-bearing cast or rigid boot immobilization for 4 to 6 weeks to allow the torn fibers to heal without stretching.
When complete ligament tearing allows the tibia and fibula to separate, surgical stabilization is necessary to restore joint alignment and preserve long-term ankle function.
When surgical stabilization is necessary, orthopedic surgeons choose between traditional rigid screws and modern flexible fixation devices.
+----------------------------------------------------------------------------------------------------+
| SURGICAL FIXATION COMPARISON MATRIX |
+----------------------------------+--------------------------------+--------------------------------+
| Surgical Parameter | Rigid Metallic Transfixation | Flexible Dynamic Suture-Button |
| | Screws (3.5 mm / 4.5 mm) | (e.g., Arthrex TightRope) |
+----------------------------------+--------------------------------+--------------------------------+
| Mechanical Rigidity | Complete rigid fixation; | Semi-rigid dynamic fixation; |
| | eliminates all micro-motion | permits natural fibular movement|
+----------------------------------+--------------------------------+--------------------------------+
| Second Surgery Requirement | Usually requires removal at 8– | Permanent implant; routine |
| | 12 weeks before full loading | hardware removal not required |
+----------------------------------+--------------------------------+--------------------------------+
| Physiological Joint Alignment | Risk of over-tightening the | Allows natural alignment of the|
| | syndesmosis during insertion | fibula within the tibial groove|
+----------------------------------+--------------------------------+--------------------------------+
| Postoperative Weight-Bearing | Delayed until screw removal to | Earlier weight-bearing in a |
| Timeline | prevent implant breakage | protective walking boot |
+----------------------------------+--------------------------------+--------------------------------+
[ RIGID TRANSMALLEOLAR SCREW ] [ DYNAMIC SUTURE-BUTTON SYSTEM ]
+------------------------------+ +----------------------------------+
| Transfixes Tibia & Fibula | | High-Strength FiberWire Suture |
| Rigidly; Risk of Metal Fatigue| vs | Tightened Between Metallic Buttons|
| Requires Second Removal Step | | Preserves Micro-Motion Dynamics |
+------------------------------+ +----------------------------------+
Transfixation screws pass through three or four bone cortices to hold the tibia and fibula together. While effective at stabilizing the joint, rigid screws restrict the natural rotation of the fibula during walking. As a result, patients often require a second procedure at 8 to 12 weeks to remove the hardware before resuming full activity and sports.
Modern surgical approaches frequently utilize flexible suture-button systems (such as the Arthrex TightRope). This implant uses a strong FiberWire suture suspended between two titanium buttons placed against the outer bone walls.
Dynamic Motion: Maintains accurate reduction of the ankle mortise while allowing natural fibular movement during gait.
No Routine Hardware Removal: Eliminates the need for a second surgery to remove metalwork, allowing for earlier weight-bearing and faster functional rehabilitation.
Failing to recognize or properly treat a high ankle sprain can lead to chronic lower leg issues.
[ PATHWAY TO POST-TRAUMATIC ARTHROSIS ]
|
+---------------------------------------+---------------------------------------+
| |
[ CHRONIC MORTISE WIDENING ] [ ALTERED CARTILAGE LOADING ]
| |
- Unhealed Syndesmosis Leaves Lateral Gap - Reduced Talofibular Contact Area
- Talus Shifts Lateral by Just 1 mm - Joint Contact Pressures Spike by 42%
- Causes Uneven Weight Distribution Across Cartilage - Accelerates Chondrocyte Loss & Erosion
|
v
[ POST-TRAUMATIC OSTEOARTHRITIS ]
- Chronic Ankle Pain & Recurrent Swelling
- Progressive Stiffness & Joint Space Narrowing
- May Require Ankle Arthrodosis or Arthroplasty
Studies show that a 1-millimeter lateral shift of the talus reduces the contact area between the tibia and talus by up to 42%. This reduction concentrates weight-bearing forces onto a smaller surface area of cartilage, accelerating joint wear and increasing the risk of early-onset post-traumatic osteoarthritis.
Rehabilitation after a high ankle sprain requires a gradual, phased approach focused on restoring strength, joint position awareness (proprioception), and dynamic rotational stability.
Phase 1 (Weeks 0–4): [ Protected Phase ] ===> Non-weight-bearing in cast/boot; swelling control.
Phase 2 (Weeks 4–8): [ Mobility Phase ] ===> Gentle weight-bearing, sagittal-plane range of motion.
Phase 3 (Weeks 8–12): [ Strengthening Phase ] ===> Proprioceptive training, resistance bands, gait correction.
Phase 4 (Weeks 12+): [ Sports Return ] ===> Multi-directional agility drills, pivoting, sports clearance.
Phase I: Protection and Inflammation Control (Weeks 0–4)
Focuses on protecting healing ligaments using a non-weight-bearing cast or rigid walking boot, along with elevation and gentle, non-weight-bearing range-of-motion exercises in the sagittal plane (flexing the foot up and down).
Phase II: Progressive Weight-Bearing and Mobility (Weeks 4–8)
Gradually introduces weight-bearing as tolerated while protecting the ankle from outward rotational movements. Exercises focus on rebuilding calf strength and basic balance.
Phase III: Proprioceptive Retraining and Dynamic Stability (Weeks 8–12)
Includes single-leg balance training, wobble board exercises, and functional movements to restore joint position sense and protect against re-injury.
Phase IV: Sport-Specific Agility and Pivoting (Weeks 12+)
Gradually incorporates multi-directional agility drills, lateral cutting maneuvers, and sport-specific training once full strength and pain-free movement are achieved.
Recovering from complex sports injuries requires precise diagnosis, biomechanical insight, and an expertly guided rehabilitation path. Navigating a High Ankle Sprain vs. Normal Sprain successfully requires the support of a dedicated orthopedic specialist to protect long-term joint function.
For patients seeking elite bone and joint care, consulting Dr. Hemant Sharma offers a gold-standard path to recovery. Currently serving as the Chairman of the Department of Orthopaedics at Marengo Asia Hospital, Gurgaon, Dr. Hemant Sharma brings over 27 years of extensive clinical and surgical experience across India and the UK. Holding an esteemed FRCS (Trauma & Orthopaedics) from the Royal College of Surgeons of England, he specializes in arthroscopic interventions, joint preservation, and advanced sports injury management, helping patients safely restore full mobility.
#SyndesmosisTear #LateralAnkleLigaments #AnteriorTalofibularLigament #ATFLInjury #AnkleJointWidening #SqueezeTestAnkle #ExternalRotationInjury #AnkleArthroscopyGurgaon #SportsInjurySpecialist #DrHemantSharmaOrthopaedics #MarengoAsiaHospital #AnkleInstability #TibiofibularLigament #InversionAnkleSprain #EversionAnkleInjury #AnkleTightRopeProcedure #SyndesmoticScrewFixation #FootAndAnkleSurgeonGurgaon #AnkleJointPreservation #ChronicAnklePain #PostTraumaticArthritis #WeightBearingRestrictions #SportsMedicineDelhiNCR #OrthopaedicChairmanGurgaon #AnkleLigamentReconstruction #LowerLegTrauma #FibulaSeparation #MobilityRestoration #SoftTissueHealingTimeline #FRCSOrthopaedicSurgeon
A syndesmotic injury takes twice as long to heal because it tears the high fibrous complex holding the tibia and fibula bones together. Unlike a standard lateral sprain where tissues can heal without bearing direct vertical weight, every step taken spreads these two long leg bones apart. This consistent widening disrupts healing, requiring extended non-weight-bearing protection to prevent long-term joint instability.
The primary difference lies in where the pain and tenderness are located. A normal sprain causes localized swelling, bruising, and pain below the ankle joint along the outer edge. A high ankle sprain causes pain that radiates upward into the lower shin bone, which is easily triggered during a clinical “Squeeze Test.”
While a skilled specialist can suspect a high sprain using manual exams like the external rotation test, an MRI or weight-bearing X-rays are crucial for a definitive diagnosis. Imaging clearly distinguishes between a High Ankle Sprain vs. Normal Sprain by measuring the precise space between the tibia and fibula to check for any unstable bone separation.
Surgery is required when a high ankle sprain causes complete ligament separation, allowing the shin bones to widen under weight. While basic lateral tears respond well to physical therapy, an unstable syndesmotic tear needs internal stabilization—using syndesmotic screws or dynamic flexible cords—to hold the bones in place so the tissue can heal correctly.
Dr. Hemant Sharma is the best orthopeadics surgeon in Gurgaon due to his extensive 27-year background and specialized training in the UK, holding the prestigious FRCS (England) designation. As Chairman of Orthopaedics at Marengo Asia Hospital, he combines advanced arthroscopic techniques with precise post-injury rehabilitation plans, ensuring complex sports injuries heal fully without chronic long-term joint weakness.